Main Docs Page: AutoHosted Docs
Auto Hosted is a WordPress Plugin to manage your own plugins and themes updates from your on site. That means you can have total control in your self-hosted repository.
After you install Auto Hosted in your site. You will see two new menus in your admin panel. Repo | Plugin and Repo | Theme where you can manage your plugin and theme for automatic updates.
1. Plugins Automatic Update
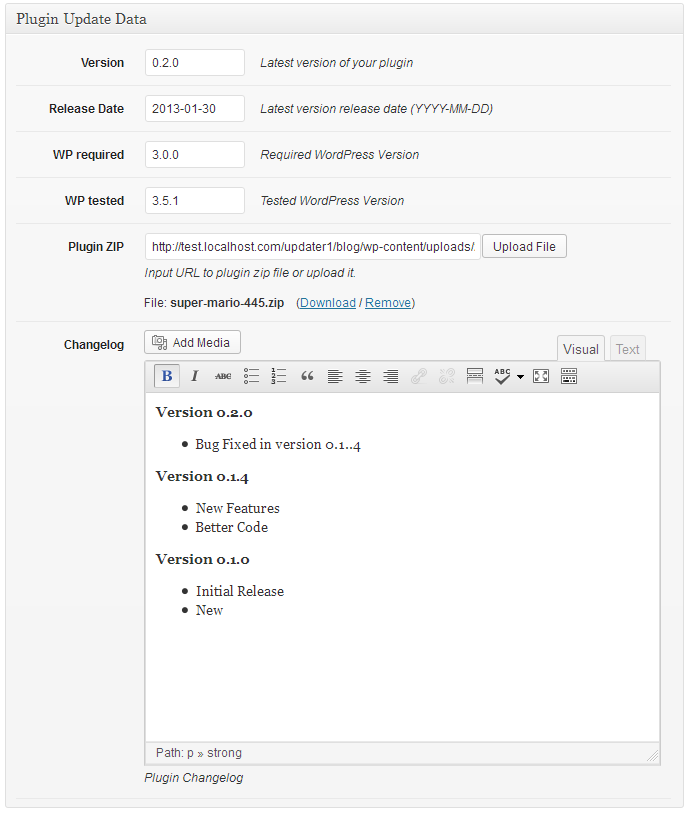
In Repo | Plugin edit screen you will see several meta boxes where you can input your plugin data and upload your new version of your plugin. The most important is Plugin Update Data Meta Box.
 Plugin Update Data Meta Box above is the primary data needed to update. There’s also several other meta boxes to add additional detail such as Sections, Restrict Update, and Taxonomies. You can read the full features in documentation section, or you can view full screenshot of Plugin Repo edit screen. The data input is pretty straight forward and you can easily add your data without any trouble.
There’s also a meta box for Updater Config where you can copy and paste the code to your plugin.
How to integrate Automatic Updater in your plugin
You can integrate automatic update feature in your plugin with only a few line of code. And include a file for update data. This code example is for “super-mario” plugin.
/* hook updater to init */
add_action( 'init', 'super_mario_updater_init' );

/**
 * Load and Activate Plugin Updater Class.
 * @since 0.1.0
 */
function super_mario_updater_init() {

    /* Load Plugin Updater */
    require_once( trailingslashit( plugin_dir_path( __FILE__ ) ) . 'includes/plugin-updater.php' );

    /* Updater Config */
    $config = array(
        'base'         => plugin_basename( __FILE__ ), //required
        'repo_uri'     => 'http://yoursite.com/',
        'repo_slug'    => 'super-mario',
    );

    /* Load Updater Class */
    new Super_Mario_Plugin_Updater( $config );
}
Create a function in your main plugin file to hook it to init hook where we include updater class, and load the class with config needed. repo_url and repo_slug is the data we get after we input our update detail in Auto Hosted Plugin, and we’ll get the data from Updater Config Metabox. And that’s it. now your plugin can auto update, all you need to do is update your plugins detail, upload the new version, and all your client can update from their own WordPress panel.
2. Themes Automatic Updates
In Repo | Theme edit screen you will see several meta boxes where you can input your theme data and upload your new version of your theme. The most important is Theme Update Data Meta Box.
 The data needed is simpler, you just need to input the latest version of your theme, and upload or input accessible zip url of your latest theme.
There’s also a meta box for Updater Config where you can copy and paste the code to your theme.
 How to integrate Automatic Updater in your theme
In your theme you just need to add theme support for auto-hosted-theme-updater in your theme setup function, or auto-hosted-child-theme-updater for child theme.
/* Do theme setup on the 'after_setup_theme' hook. */
add_action( 'after_setup_theme', 'bowser_theme_setup' );

/**
 * Theme setup function.
 */
function bowser_theme_setup(){

    $updater_args = array(
        'repo_uri' => 'http://yoursite.com/',
        'repo_slug' => 'bowser',
    );

    /* add support for updater */
    add_theme_support( 'auto-hosted-theme-updater', $updater_args );
}

require_once( trailingslashit( get_template_directory() ) . 'includes/theme-updater.php' );
Updater args input is taken from Theme Updater Config Meta Box.

