Main Docs Page: f(x) Updater Docs
Here’s step by step instruction to configure your theme updates using f(x) Updater plugin.
1. Add theme update repository
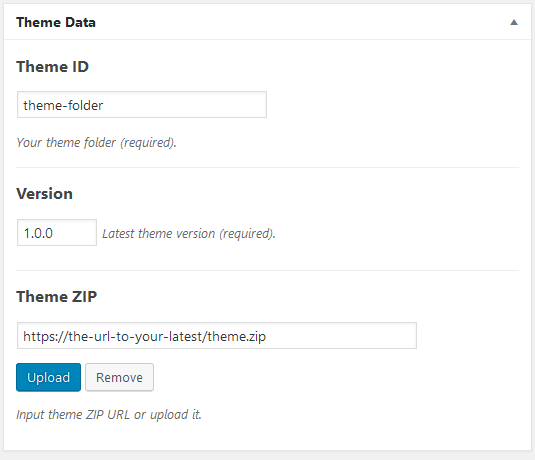
Navigate to f(x) Updater > Themes, and click “Add New” to create your theme update repository. And fill the data as example below:

The theme folder should be unique. Everything else are self-explanatory.
2. Include the updater class in your theme
You can use the updater class included in the f(x) Updater plugin:
https://github.com/turtlepod/fx-updater/blob/master/includes/updater.php
VERY IMPORTANT: Make sure you change the class name with your own theme prefix.
Include it in your theme. example code:
/* Include theme updater. */
require_once( trailingslashit( get_template_directory() ) . 'includes/updater.php' );
and configure the config array as needed:
$this->config = array(
    'server'  => 'http://your-website/',
    'type'    => 'theme',
    'id'      => 'theme-folder',
    'api'     => '1.0.0', // leave it as is
    'post'    => array(), // leave it as is
);
server
This is your website home url where you install f(x) Updater. This is the server where the theme will pull the update data.
type
Updater type, change the value to “plugin” for single plugin updater, “theme” for single theme updater, and “group” for multi item updates (within the group). In this case we use it for theme updates.
id
This is the item id. add it with theme id/theme folder. as you have configured in f(x) Updater (in step 1)
api
Current f(x) updater api version. currently leave it as “1.0.0”. This is to make it easier for future development, in case we change method in the future.
post
Data you add here will send via $_POST to your server when checking for updates. useful if you want to extend this plugin and use update restriction/license key, etc
3. That’s it !
- Install your theme (with the updater.php included and configured) in other sites/client sites.
- If you add new feature to your theme and create version 2 (new version).
- Update your f(x) Updater Theme repository entry (step 1): change the version number with new version. change the ZIP URL to this new version.
- Don’t forget to save/update.
- Visit/log-in your other/client site where you install the theme.
- Navigate to “Dashboard > Updates” to check new updates.
- Update your theme.
Note: WordPress check updates once in 12 hours. If you don’t see the updates click “Check Again” button and keep track on the “Last Checked” time stamp on the “Dashboard > Updates” Screen.
